
The 30-second answer: Fuel line goes stiff, brittle, or cracked with age and heat, and ethanol blends make the problem worse. Look along the whole run from the tank to the carburetor for cracks, hard spots, swelling, and wet stains at the clamps. A line that leaks gas is a fire hazard. A line that sucks air causes rough running and stalls. Replace the damaged section with fuel-rated hose of the correct inside diameter, and use the right clamps.
The fuel line is the cheapest part on a generator, and one of the easiest to overlook. It runs from the tank through the shutoff valve and the filter to the carburetor. It is exposed to engine heat, and gasoline slowly breaks down the rubber. A line that has gone bad can leak a little at a time, or split only when the engine is hot, which makes it hard to catch in a quick look.
Why Fuel Lines Fail
Three things break fuel lines. The first is age. Hose hardens over the years, and the inside lining can crack even when the outside looks fine. The second is ethanol. Ethanol blends in modern gasoline attack rubber that was not made for them, and they make older hose swell, soften, or harden. The third is heat. A line that runs close to the muffler or the engine block cooks faster than one that sits in cooler air. A generator that sits for long periods with fuel in the line is the worst case, because the fuel sits against the hose and does its damage slowly.
Step One: Inspect the Whole Run
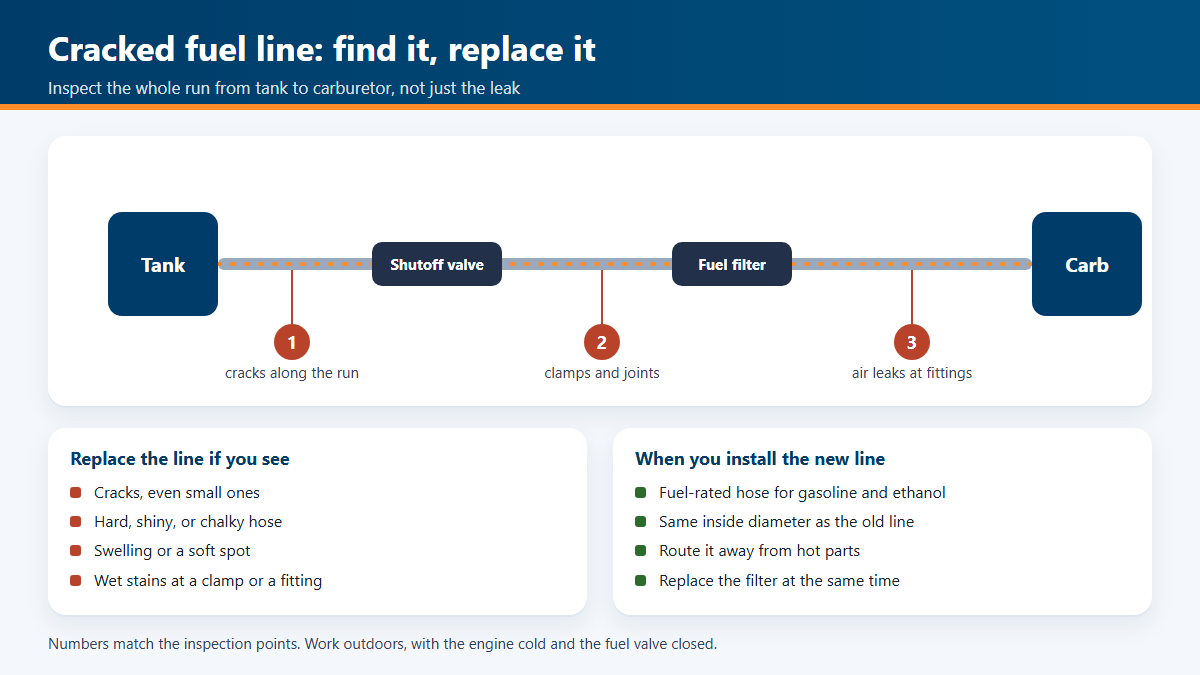
Trace the line from the tank outlet to the carburetor inlet, including the shutoff valve and filter. Look for cracks, especially at bends and at the ends where the hose meets a fitting. A crack that opens when you bend the hose is a failing line. Feel each section. A healthy line is flexible with a smooth surface. A line that is hard, shiny, or chalky is aging out, even if it has no visible crack yet.
Look for swelling or a soft spot. A hose that feels spongy or bulges is breaking down from the inside. A sticky film on the outside can mean the hose is weeping. Check for stains on the frame, the engine shroud, and the floor under the unit, which show where a leak has been dripping. The dark spot on the floor may be the only sign of a leak that happens when the engine is hot.
Work with the engine cold and the fuel valve closed. Do not inspect the line near an open flame or with a hot exhaust nearby.
Step Two: Check the Clamps and Fittings
Loose clamps leak, and overtightened clamps can crack the hose or the fitting. Tighten a clamp only until it holds, then check it again after the first run. Replace any clamp that is rusted, bent, or has lost its grip. Use spring clamps or worm-gear clamps that fit the hose diameter, and avoid the type that cuts into the hose. Check the metal or plastic fittings too. A cracked plastic fitting or a bent barb will leak even with a new hose on it.
Step Three: Look for an Air Leak
A fuel line that draws air at a joint or a crack causes lean running, hard starts, and stalls. The problem often shows up when the tank is nearly full and the fuel head is low, or when the engine runs for a while and then loses power. Engines that run rough and stall with fuel in the tank are a good reason to check the line for an air leak.
Inspect each joint carefully with the engine off. Look for a joint where the hose has pulled off the barb, or a clamp that sits in the wrong place. If the problem persists after the line checks out, the fuel pump test guide and the fuel valve guide cover the next suspects.
Watch: “How to Fix a Fuel Line on Predator Generator (4000, 7000, 8000, 8750, and 9000 Watt systems)” on YouTube. A full fuel hose replacement on a Predator unit. Compare the routing with your own engine before you start, since the hose layout varies by model.
Step Four: Choose the Right Replacement Hose
Use fuel-rated hose marked for gasoline and ethanol blends. Do not use vinyl, clear tubing, or garden hose, which breaks down quickly in gasoline. The hose must match the inside diameter of the old line, because a smaller hose restricts fuel flow and a larger one can leak at the clamp. Measure the old hose across the inside and the outside. Many generators use a common size, but do not guess. Take the old hose to the parts counter, or match the part number from the manual.
Some units use hard lines or hose with a built-in fitting. Keep the fitting type the same as the original, and do not mix a plastic fitting with a metal barb unless the manufacturer lists it as compatible. The old line is the best reference for the length and shape. Keep it until the new line is installed and tested.
Step Five: Replace the Damaged Section
Shut off the fuel valve, and drain or pinch the line before you disconnect it. Take a photo of the routing first, because the line has to go back the same way. Cut the new hose to the same length, leaving a little room for the clamp. Install the hose fully onto each fitting, and clamp it securely. Do not let the new hose rub on the engine, the muffler, or a sharp edge. A chafed spot will fail later.
Turn the fuel back on and check every joint for drips before you start the engine. A drip at a joint can be fixed by reseating the hose or tightening the clamp, but a leak in the middle of the hose means the hose is bad and must be replaced.
Step Six: Replace the Filter and Check the Rest of the Path
Replace the fuel filter at the same time, since the filter is part of the same run and it collects the debris the line sheds. The fuel filter replacement guide shows where it sits and which way it faces. The fuel system guide covers the rest of the path from tank to carburetor.
Start the engine and let it run at idle for a few minutes. Listen for a change, watch the joints, and check for any new smell or wet spot. Then run it under a light load and watch the performance for ten minutes.
Common Mistakes to Avoid
- Patching the line with tape or a sleeve. Patches do not hold gasoline for long.
- Using a hose one size too small, which starves the engine under load.
- Overtightening the clamp until it cuts the hose.
- Routing the new hose against a hot surface, where it will harden again.
- Leaving the old, brittle hose in place next to the new section. The rest of the line may be just as worn.
Gasoline leaks are a fire hazard. Work outdoors, away from heat and sparks, with the engine cold and the fuel valve closed. Do not smoke nearby. Wipe up any spilled fuel with rags and dispose of them safely. Never run the engine with a known fuel leak, and do not start the unit if you smell gas near the engine.
Frequently Asked Questions
Can I patch a cracked fuel line?
No. A patch or tape will not hold gasoline for long, and a leak can start again without warning. Replace the damaged section.
How often should a fuel line be replaced?
There is no fixed interval. Inspect the line at each seasonal check, and replace it when it is hard, cracked, swollen, or leaking. A generator that runs ethanol blends and sits for long periods will usually need a new line sooner.
Is any hose fine for a generator?
Only hose rated for gasoline. The rating on the hose is the one to look for. Ordinary tubing and garden hose will harden and crack in gasoline, which is exactly the failure you are trying to prevent.
The hose slips off the fitting every time. What do I do?
Check whether the barb is cracked or corroded. Clean the barb, use a clamp that sits on the hose body rather than the edge, and make sure the hose is pushed fully onto the barb. If the fitting is damaged, it needs replacing, not just a new hose.
Can I drain the tank through the fuel line?
Some units allow it, but it is easy to spill fuel that way. Use a shutoff and a container, and drain outdoors. The guide to draining old gas explains the steps.