
Generator brushes are small carbon blocks that feed excitation current to the spinning rotor through two copper slip rings — and when they wear short or the rings glaze over, you get weak, flickering, or zero output from a perfectly running engine. Inspection takes five minutes and two screws; replacement brushes run $8 to $15. But confirm your unit even has brushes first — many don’t.
- Check the parts diagram before hunting brushes — inverter units and many capacitor-excited open frames are brushless.
- The tell: output that flickers, fades as the unit warms, or comes and goes with vibration.
- Brushes need about 1/4 inch of carbon and a spring that still pushes; the pair costs $8 to $15.
- Half of “bad brush” diagnoses are actually glazed slip rings — clean the rings before buying anything.
- All of this happens engine OFF, plug wire pulled.
What Do Brushes Do in a Generator?
On a brushed generator head, the voltage regulator sends DC excitation current into the rotor — the part spinning 3,600 RPM — and the only way to feed electricity into something spinning is through sliding contacts: two spring-loaded carbon brushes riding on two polished copper slip rings at the rotor’s tail end. That sliding contact is a wear item, the one part of the generator head designed to be consumed. As the carbon shortens, spring pressure fades and contact gets intermittent — and intermittent excitation means output that flickers, sags when things heat up and expand, or drops to nothing while the engine hums along obliviously. Brush and ring trouble sits behind a solid share of no-power complaints on brushed units, and it’s the cheapest, most accessible repair inside the whole generator head. Five minutes and two screws tell you everything.
First: Does Your Generator Even Have Them?
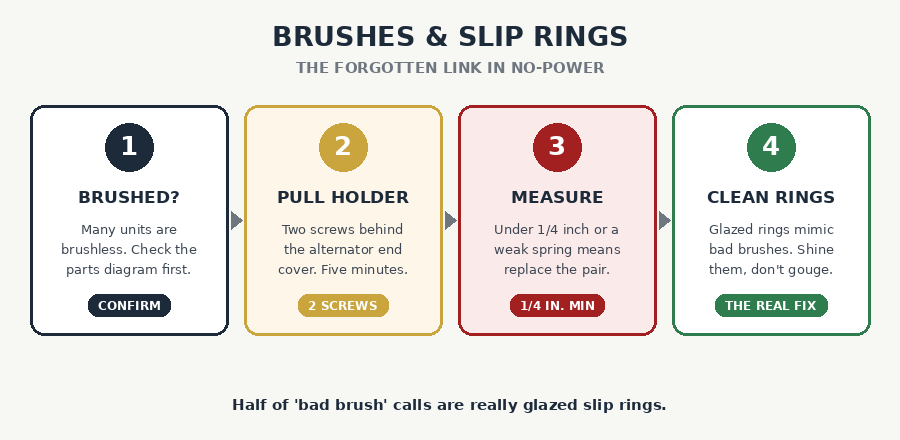
One paragraph that saves people an afternoon: plenty of generators are brushless. Inverter units, most Honda EU models, and a lot of budget capacitor-excited open frames have no brushes at all — their excitation works differently. So before disassembling anything, pull up your model’s parts diagram (the manual, or the exploded views on the manufacturer’s or parts sites) and search it for “brush assembly.” No brushes listed on a no-power unit means your suspects are the capacitor or the AVR instead — start with testing the capacitor — and if you haven’t yet confirmed what the outlets are actually doing, two minutes with a multimeter comes before any teardown.
Pulling and Reading the Brushes
Engine off, spark plug wire pulled so nothing surprises you. The brush holder lives under the alternator end cover — the plastic or steel bell opposite the engine — held by a couple of screws, with the brush assembly itself mounted on two more, feeding two wires. Pull the holder and read what’s in your hand. Carbon length: about 1/4 inch of brush remaining is the working floor; at or under it, replace the pair. Spring: it should push the brush out firmly — a lazy spring fails a long brush. Wear pattern: even and shiny-faced is normal; chipped, cracked, or worn crooked means replace and look at why. The brushes are cheap enough — $8 to $15 for a brush assembly matched to your model — that anything questionable just gets swapped. Note the wire positions before disconnecting (photo, thirty seconds); reversing them on some units flips polarity and costs you output.
The Slip Rings — the Half Everyone Misses
Now look past the brushes at what they ride on, because here’s the number that reframes this repair: about half of the “bad brush” calls I’ve been around turned out to be glazed slip rings — the brushes measured fine, and the copper they ran on had built up a hard, darkened film that quietly insulates the contact. New brushes on glazed rings buys you a week. The rings should be bright, smooth copper; dark brown or mottled glaze is your actual fault. Clean them with a fine Scotch-Brite pad or 400-plus grit paper, turning the rotor by hand (plug wire still off) to work the full circumference evenly — you’re shining the surface, not removing metal, so no coarse grit and no gouging. Grooved or deeply worn rings are rotor-replacement territory and usually the point where the repair math dies on a budget unit. While everything’s open, one meter check earns its keep: ohms across the two slip rings reads the rotor winding — a reading in the low tens of ohms is typical, infinite means a broken rotor winding, and near-zero means a short. Either of those, and brushes were never the story; the excitation chain diagnosis continues at the AVR test and the no-power walkthrough.
Every step here is engine-off, plug-wire-pulled work — the generator head has no business spinning with your fingers and abrasives inside the end cover. Let it cool first; slip rings sit near an exhaust that holds heat a long time. Carbon dust from the old brushes wipes out with a dry rag, not compressed air toward your face. And when the covers go back on, they all go back on — that bell also keeps fingers and debris out at 3,600 RPM.
What It Costs
Brushes: $8 to $15 the pair. Ring cleaning: one Scotch-Brite pad. The repair is fifteen minutes once you’ve found the holder — against a $90 to $150 shop diagnostic that, on a brushed unit with flickering output, would very likely bill an hour to do this exact page. The honest stop-line is a damaged rotor: grooved rings or a failed winding means a rotor at $80 to $150-plus, and on a $400 open frame that’s the moment to price whole replacements instead.
This bad-brush repair on a Champion shows exactly what the holder and rings look like in the wild:
Frequently Asked Questions
What are the symptoms of bad generator brushes?
Weak or flickering output from a smooth-running engine, power that fades as things warm up, output that stutters when the unit vibrates, or zero volts entirely. The overlap with other excitation failures is exactly why the five-minute physical inspection beats guessing — brushes show their wear honestly.
How long do generator brushes last?
Hundreds of hours — on an occasional-use backup generator, effectively a decade or more. That’s the catch, honestly: they fail so slowly that nobody ever suspects them. Hard-run units at job sites are a different story and earn a yearly look under the end cover.
Can I clean slip rings instead of replacing brushes?
Often that IS the repair — glazed rings mimic worn brushes constantly, and I’d clean the rings before spending a dime. Fine Scotch-Brite or 400+ grit, rotate the rotor by hand for even coverage, and stop at shiny. If the brushes still measure over 1/4 inch with good springs, reinstall them and test.
Do inverter generators have brushes?
As a rule, no — inverter units and many capacitor-excited open frames are brushless by design, which is part of their low-maintenance pitch. A no-power inverter is an electronics or capacitor conversation, not a brush hunt. The parts diagram for your exact model settles it in one search.
Which way do the brush wires connect?
The way they came off — take the photo before you unplug anything, because on many heads the two terminals set excitation polarity, and swapped wires can mean weak or zero output from brand-new brushes. If you inherited a mystery unit mid-repair, the parts diagram or the wire colors at the AVR sort it out.